Tilapia Farming Made Easy for Beginners
A Complete Step-by-Step Guide to Successful Tilapia Aquaculture
Tilapia farming is one of the most accessible forms of aquaculture for beginners. With proper planning and management, you can establish a profitable tilapia farm with minimal investment. This comprehensive guide covers everything you need to get started.
Step 1: Choose the Right Species
Nile Tilapia (Oreochromis niloticus)
Why it's ideal for beginners:
- Fast growth rate (reaches market size in 5-6 months)
- High disease resistance and hardiness
- Wide temperature tolerance (20-35°C)
- Excellent feed conversion ratio (1.5-1.8:1)
- High consumer acceptance worldwide
Other Popular Varieties
Mozambique Tilapia (O. mossambicus): Very hardy but slower growth
Blue Tilapia (O. aureus): Good cold tolerance, grows well in cooler climates
Red Tilapia: Popular for appearance, commands premium prices
GIFT Strain (Genetically Improved Farmed Tilapia): Enhanced growth rates through selective breeding
| Species | Growth Rate | Temperature Range | Special Considerations | Best For |
|---|---|---|---|---|
| Nile Tilapia | Fast (5-6 months) | 20-35°C | Most widely farmed globally | Beginners, commercial farms |
| Mozambique Tilapia | Moderate (6-8 months) | 17-35°C | Very hardy, good for poor conditions | Extensive systems, harsh environments |
| Blue Tilapia | Moderate (6-7 months) | 15-32°C | Good cold tolerance | Cooler climates |
| Red Tilapia | Fast (5-6 months) | 22-30°C | Premium market price | Niche markets, restaurants |
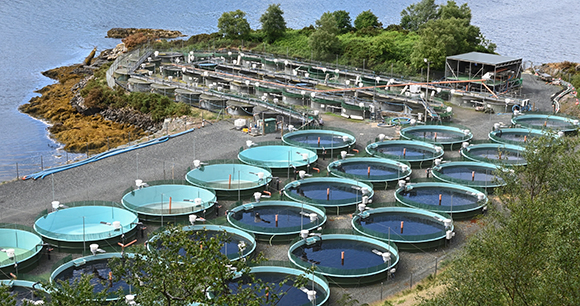
Step 2: Prepare the Pond or Tank
Choosing Your Farming System
Earthen Ponds
Advantages:
- Lower construction costs
- Natural food production
- Better water stability
- Lower operating costs
Stocking Density: 3-5 fish/m²
Ideal Size: 100-500 m² for beginners
Concrete Tanks
Advantages:
- Better control over environment
- Easier to clean and manage
- Higher stocking densities possible
- Long lifespan
Stocking Density: 10-20 fish/m²
Ideal Size: 10-50 m² for beginners
Plastic/FRP Tanks
Advantages:
- Easy to install and move
- Low maintenance
- Good for small spaces
- Durable and long-lasting
Stocking Density: 15-25 fish/m²
Ideal Size: 2-20 m² for beginners
Essential Infrastructure
Water Source: Ensure reliable access to clean water (well, stream, or municipal supply)
Aeration System: Paddlewheel aerators, air pumps, or water fountains for oxygen
Drainage: Proper outlet systems for water exchange and harvesting
Fencing: Protect from predators and unauthorized access
Feeding Area: Designated spots for consistent feeding routines
Step 3: Stocking Fingerlings
Selecting Quality Fingerlings
Source from reputable hatcheries that provide:
- Disease-free certification
- Uniform size (2-5 grams each)
- Active and healthy appearance
- Proper transportation facilities
- Technical support and guidance
Recommended Stocking Rates:
- Earthen ponds: 3-5 fingerlings/m²
- Concrete tanks: 10-15 fingerlings/m²
- Intensive systems: 15-25 fingerlings/m²
Stocking Procedure
Acclimation Process:
- Float transport bags in pond/tank for 15-20 minutes
- Gradually mix pond water into transport water
- Release fingerlings gently during cooler hours
- Monitor closely for first 24 hours
Optimal Conditions for Stocking:
- Water temperature: 25-30°C
- Early morning or late afternoon
- Calm weather conditions
- Good water quality parameters
Step 4: Feeding Management
Comprehensive Feeding Guide
| Growth Stage | Fish Weight | Protein % | Feeding Frequency | Daily Ration (% of body weight) | Feed Type |
|---|---|---|---|---|---|
| Fry | 0.1 - 5g | 40-45% | 4-5 times daily | 15-20% | Powder/Crumble |
| Fingerling | 5 - 30g | 35-40% | 3-4 times daily | 10-15% | Small Pellets (1-2mm) |
| Juvenile | 30 - 100g | 30-35% | 2-3 times daily | 5-8% | Medium Pellets (2-3mm) |
| Grow-Out | 100 - 500g | 28-32% | 2 times daily | 3-5% | Large Pellets (3-5mm) |
Feeding Best Practices
Avoid Overfeeding: Feed should be consumed within 15-20 minutes. Uneaten feed pollutes water and wastes money.
Optimal Feeding Times: Early morning (7-9 AM) and late afternoon (4-6 PM) when water temperatures are moderate.
Feed Quality: Use fresh, high-quality feed from reputable manufacturers. Store in cool, dry conditions.
Observation: Watch feeding behavior - active, aggressive feeding indicates good health, while slow consumption may signal problems.
Step 5: Water Quality Management
Critical Water Parameters
| Parameter | Optimal Range | Critical Level | Monitoring Frequency | Corrective Actions |
|---|---|---|---|---|
| Temperature | 25-30°C | <20°C or >35°C | Daily | Shade, water exchange, aeration |
| Dissolved Oxygen | 5-8 mg/L | <3 mg/L | Daily (morning) | Aeration, reduce feeding, water exchange |
| pH | 6.5-8.5 | <6.0 or >9.0 | Weekly | Lime (if low), water exchange (if high) |
| Ammonia | <0.05 mg/L | >0.1 mg/L | Weekly | Water exchange, reduce feeding, biofilters |
| Nitrite | <0.1 mg/L | >0.5 mg/L | Weekly | Water exchange, salt addition (0.1-0.3%) |
Water Exchange Schedule
Earthen Ponds: 10-20% weekly or as needed based on water quality tests
Tank Systems: 20-30% weekly, or continuous flow systems with 10-15% daily exchange
Signs of Poor Water Quality:
- Cloudy or discolored water
- Foul odors
- Excessive foam or bubbles
- Fish gasping at surface
- Reduced feeding activity
Steps 6-8: Monitoring, Harvesting & Marketing
Growth Monitoring
Monthly Sampling: Weigh 30-50 fish to calculate average weight and adjust feeding rates
Expected Growth: 2-4 grams per day under optimal conditions
Target Sizes:
- Plate size: 200-300g (4-5 months)
- Market size: 300-500g (5-6 months)
- Large size: 500-800g (6-8 months)
Record Keeping: Maintain logs of feeding, growth, water quality, and expenses
Harvesting Techniques
Partial Harvesting: Remove larger fish first, allowing smaller ones to grow
Complete Harvest: Drain pond/tank and collect all fish at once
Best Practices:
- Withhold feed 24-48 hours before harvest
- Harvest during cooler hours
- Handle fish gently to avoid stress and damage
- Use proper grading equipment
Expected Yield: 3-5 kg/m² in earthen ponds, 10-20 kg/m³ in tanks
Marketing Strategies
Potential Markets:
- Local fish markets and vendors
- Restaurants and hotels
- Supermarkets and grocery stores
- Fish processing companies
- Direct to consumers
Pricing Considerations:
- Size and quality of fish
- Market demand and season
- Competition and local prices
- Live vs. processed value
Value Addition: Consider processing (filleting, smoking) for higher returns
Essential Success Tips for Beginners
Start Small
Begin with 100-200 fish to learn the basics before scaling up. Small-scale operations are easier to manage and involve lower financial risk.
Continuous Learning
Join local farmer groups, attend workshops, and read updated materials. Aquaculture techniques constantly evolve with new research.
Financial Planning
Budget for all costs: construction, fingerlings, feed, labor, utilities, and unexpected expenses. Keep detailed financial records.
Be Patient
Tilapia farming requires 5-6 months from stocking to harvest. Don't expect immediate returns. Focus on proper management throughout the cycle.
Sample Profitability Calculation (Small Scale)
Investment
Pond/Tank Setup: $500-1000
Fingerlings (500): $100-150
Feed (6 months): $300-400
Equipment: $200-300
Total: $1100-1850
Production
Stocking: 500 fingerlings
Survival Rate: 80% (400 fish)
Average Weight: 400g
Total Production: 160 kg
Revenue
Sale Price: $4-6/kg
Total Revenue: $640-960
Second Cycle: Higher profit (recovered setup costs)
Annual Potential: $1280-1920
Start small, learn fast, and scale up gradually for sustainable success!

 Newspaper is an amazing magazine blogger theme that is easy to use and change to fit your needs
No comments
Post a Comment