


Backyard Fish Farming: Low-Cost Setup Guide
Transform Your Backyard into a Profitable Mini-Fish Farm
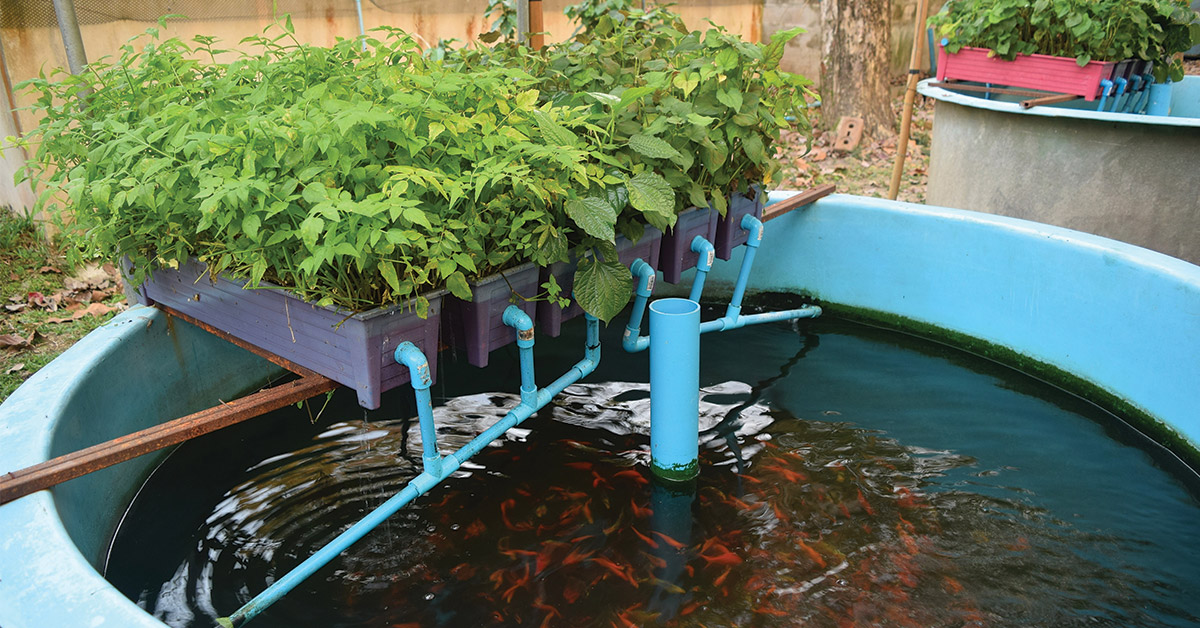
Backyard fish farming is an excellent way to produce your own protein, generate extra income, and utilize small spaces efficiently. With minimal investment, you can set up a productive fish farm right in your backyard.
Step 1: Choose Your Space
Location Requirements
Ideal Space Characteristics:
- 5-20 square meters of flat ground
- Partial shade (4-6 hours of sunlight daily)
- Access to clean water source
- Good drainage to prevent flooding
- Protection from strong winds
- Security from predators and theft
Space Utilization Tips:
- Utilize corners or unused areas of your yard
- Consider multi-level systems for small spaces
- Plan for easy access for feeding and maintenance
- Leave space for water storage and equipment
Site Preparation
Ground Preparation:
- Clear vegetation and level the ground
- Remove sharp objects and rocks
- Create a slight slope for drainage if needed
- Install basic fencing if necessary
Infrastructure Planning:
- Water source placement
- Electricity access for aeration
- Storage for feed and equipment
- Work area for maintenance tasks
Cost: Minimal - mostly labor for clearing and preparation
Step 2: Select a Container
Low-Cost Container Options
Plastic Tanks
Cost: $20-100
Capacity: 500-2000 liters
Pros:
- Durable and long-lasting
- Easy to clean and maintain
- Readily available
- Lightweight when empty
Cons:
- Initial cost higher than some options
- May need support structure
Barrels & Drums
Cost: $5-20 each
Capacity: 200-250 liters
Pros:
- Very low cost
- Easy to find used
- Good for small-scale trials
- Can be stacked or arranged creatively
Cons:
- Limited capacity
- May need cleaning if previously used
- Shorter lifespan than dedicated tanks
Tarpaulin Ponds
Cost: $15-50
Capacity: 1000-5000 liters
Pros:
- Very cost-effective for larger volumes
- Customizable shapes and sizes
- Easy to install and remove
- Good for temporary setups
Cons:
- Less durable than rigid containers
- Risk of punctures
- May need frame support
Container Setup Tips
Preparation Steps:
- Clean thoroughly with non-toxic cleaner
- Rinse multiple times to remove residues
- Install drainage system if possible
- Position for easy access and maintenance
- Consider elevation for gravity drainage
Cost-Saving Ideas:
- Use food-grade containers from restaurants
- Check local classifieds for used containers
- Repurpose old bathtubs or large containers
- Use free wooden pallets to create support frames
Step 3: Pick the Right Fish
Best Fish for Backyard Farming
| Fish Type | Growth Period | Temperature Range | Stocking Density | Special Requirements | Best For |
|---|---|---|---|---|---|
| African Catfish | 4-6 months | 22-32°C | 50-100 fish/m³ | Can breathe air, very hardy | Absolute beginners |
| Nile Tilapia | 5-6 months | 25-30°C | 30-50 fish/m³ | Warm water, good water quality | Moderate experience |
| Common Carp | 8-12 months | 15-25°C | 20-30 fish/m³ | Cooler water, more space | Cooler climates |
| Mozambique Tilapia | 6-8 months | 20-35°C | 25-40 fish/m³ | Very hardy, tolerant of poor conditions | Challenging environments |
Why Start with Catfish or Tilapia
African Catfish Advantages:
- Extremely hardy and disease-resistant
- Can survive in low-oxygen conditions
- Fast growth to market size (500-700g in 4-6 months)
- High consumer demand in many regions
- Good feed conversion ratio
Tilapia Advantages:
- Good growth rate in warm conditions
- Can reproduce in captivity
- Widely accepted in markets globally
- Can utilize plant-based feeds effectively
- Generally peaceful and easy to manage
Steps 4-5: Water Supply & Aeration
Water Supply Solutions
Water Sources:
- Borehole/tube well water (ideal - consistent temperature)
- Municipal tap water (must dechlorinate)
- Rainwater collection (free, but variable)
- Well water (test for quality first)
Water Preparation:
- Dechlorinate tap water by aerating for 24-48 hours
- Test pH (6.5-8.5 ideal for most fish)
- Ensure temperature matches existing water when adding
- Consider simple filtration for murky water
Drainage Systems:
- Install simple PVC pipe outlets
- Use gravity flow where possible
- Direct drainage to garden areas for irrigation
- Consider water recycling systems for conservation
Low-Cost Aeration Options
Solar Air Pumps:
- Cost: $15-40 for small systems
- No electricity costs
- Environmentally friendly
- Works during daylight hours
Manual Aeration Methods:
- Stir water vigorously 2-3 times daily
- Use paddle or stick to create water movement
- Splash water back into tank from height
- Install simple waterfall systems
DIY Aeration Ideas:
- Use bicycle pump with airstone
- Create venturi systems with water flow
- Use wind-powered water pumps
- Install simple fountain systems
When Aeration is Critical:
- Hot weather (less oxygen dissolves in warm water)
- High stocking densities
- After feeding (increased oxygen demand)
- When water appears still or stagnant
Steps 6-7: Stocking & Feeding
Stocking Density Guidelines
| Container Size | Catfish | Tilapia | Carp | Expected Yield |
|---|---|---|---|---|
| 1000L Tank | 100-150 fish | 80-120 fish | 60-80 fish | 40-60 kg |
| 500L Tank | 50-75 fish | 40-60 fish | 30-40 fish | 20-30 kg |
| 250L Barrel | 25-40 fish | 20-30 fish | 15-20 fish | 10-15 kg |
| 2000L Pond | 200-300 fish | 150-200 fish | 100-150 fish | 80-120 kg |
Low-Cost Feeding Solutions
Commercial Feeds:
- Starter feed (45% protein) for first 2 weeks
- Grower feed (32-35% protein) for main growth period
- Finisher feed (28-30% protein) for final month
- Buy in bulk to reduce costs
Homemade Feed Recipes:
- 30% fish meal, 30% soybean meal, 20% maize, 20% rice bran
- 25% poultry manure (well-dried), 35% maize, 40% vegetable waste
- 40% termites/insects, 30% kitchen scraps, 30% grains
Natural Food Sources:
- Duckweed grown in separate containers
- Azolla (water fern) - high protein content
- Kitchen vegetable scraps
- Earthworms from vermicomposting
Feeding Schedule:
- Fingerlings: 4-5 times daily (small amounts)
- Growing fish: 2-3 times daily
- Near harvest: 1-2 times daily
- Always feed at same times daily
Sample Budget: 1000L Backyard Fish Farm
Initial Investment
Plastic Tank (1000L): $40
Fingerlings (100 catfish): $20
Feed (6 months): $60
Aeration (solar pump): $25
Miscellaneous: $15
Total: $160
Operating Costs
Water: Minimal (rainwater/borehole)
Electricity: $0 (solar powered)
Labor: Your time (2-3 hours weekly)
Maintenance: $5 monthly
Monthly: ~$5
Expected Revenue
Survival Rate: 80% (80 fish)
Average Weight: 600g
Total Production: 48kg
Sale Price: $4/kg
Total Revenue: $192
Profit Analysis
First Cycle: $32 profit
Subsequent Cycles: $127 profit
(No tank purchase needed)
Annual Potential (2 cycles): $254
Maximizing Your Backyard Fish Farm Profit
Start Small & Scale Up
Begin with 50-100 fish to learn the basics. Reinvest profits to expand gradually. Each successful cycle builds experience and capital for growth.
Reduce Feed Costs
Grow duckweed or azolla in separate containers. Use kitchen scraps and garden waste. Consider vermicomposting for worm production.
Water Conservation
Use drained water for garden irrigation. Install simple filtration for water reuse. Collect rainwater for water changes and top-ups.
Direct Marketing
Sell directly to neighbors and local restaurants. Offer live fish for higher prices. Consider value-added products like smoked fish.
Start small, reinvest profits, and grow steadily. Your backyard fish farm can become a significant source of protein and income!

 Newspaper is an amazing magazine blogger theme that is easy to use and change to fit your needs
No comments
Post a Comment